Android
 前置知识:Java
 讲师:朱煜章 @Clancy
 日期:7 月 29 日星期六
编写属于自己的手机 APP 并不困难。在学会 Java 的语法后,我们来了解一个 Android 应用的组成部分。然后,你将可以设计你的界面,引入各式各样的组件资源,并将它们与 Java 代码中的对象相绑定,以实现属于自己的 Android 应用程序。
通过学习本课程,你将在我们提供的框架上实现一个简单的 Android 单人跳棋游戏。
 DDL: 8 月 5 日星期六 23:59
 课程回放
课程回放
 作业
作业
课前准备
本课程需要先修 Java 语言。
虽说这是 Android 课程,但你不一定需要使用 Android 手机。请在 Download Android Studio & App Tools - Android Developers (google.cn) 下载 Android Studio 作为开发平台。
Android Studio 为开发人员提供了广泛的功能和工具,用于设计、编写、调试和测试 Android 应用程序。我们在本课程需要用到的功能有:
- Java 编程窗口:Android 应用程序可以使用 Java 或 Kotlin 编写。我们在本课程选择 Java。
- 布局编辑器:Android Studio 提供了一个可视化布局编辑器,用于设计应用程序的用户界面。开发人员可以直观地添加 UI 元素、调整布局和设置属性。
- 调试工具:Android Studio 具有内置的调试工具,开发人员可以在代码中设置断点,跟踪变量的值,并执行逐行调试。
- 虚拟设备管理器:Android Studio 包含一个虚拟设备管理器,用于创建和管理模拟的 Android 设备。这使开发人员能够在没有实际设备的情况下进行应用程序的测试和调试。
- APK 构建工具:Android Studio 可以将应用程序打包为 Android 安装包(APK)。开发人员可以生成签名的 APK 文件,以便在设备上进行部署和分发。
- SDK 管理器:Android Studio 包含一个 SDK(Software Development Kit)管理器,用于下载和管理 Android 平台的各种版本和附加组件。开发人员可以根据目标设备和最低支持版本来选择所需的 SDK 组件。
学习方法
只看讲义学习 Android 将会很痛苦。下图节选自笔者的大作业报告
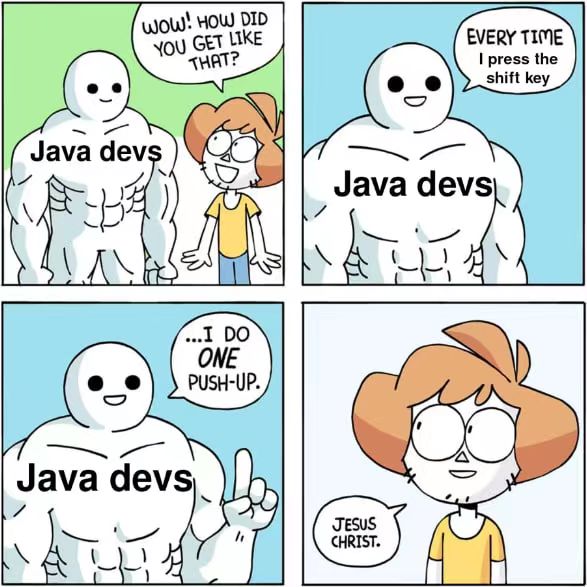
强烈建议你面向一些实际的代码(而不只是我的样例玩具代码!)学习,这样会使你更容易了解 Android 的设计模式,而且在 IDE 中可以用你的 shift 键直接跳转到你需要浏览的地方,这比看讲义看到不明白的地方再去百度/谷歌快太多了。在这份讲义的最后,我会给你提供几个例子。
Android 项目的构成
让我们从创建一个 Android 项目开始吧。在 Android Studio 中创建一个新空项目。
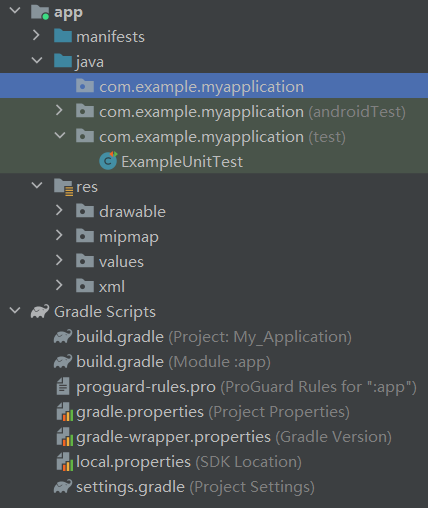
上面的 app 部分包含你的程序的 manifest 文件、代码和资源。下面的部分用于构建,当你要引入第三方库的时候就需要更改这里的 build.gradle 文件(好像 Android Studio 会帮你做到)。
作为一个计算机系的学生,我们一般更善于“写程序”,那么我们先来看一些“不是程序”的玩意吧。
资源库
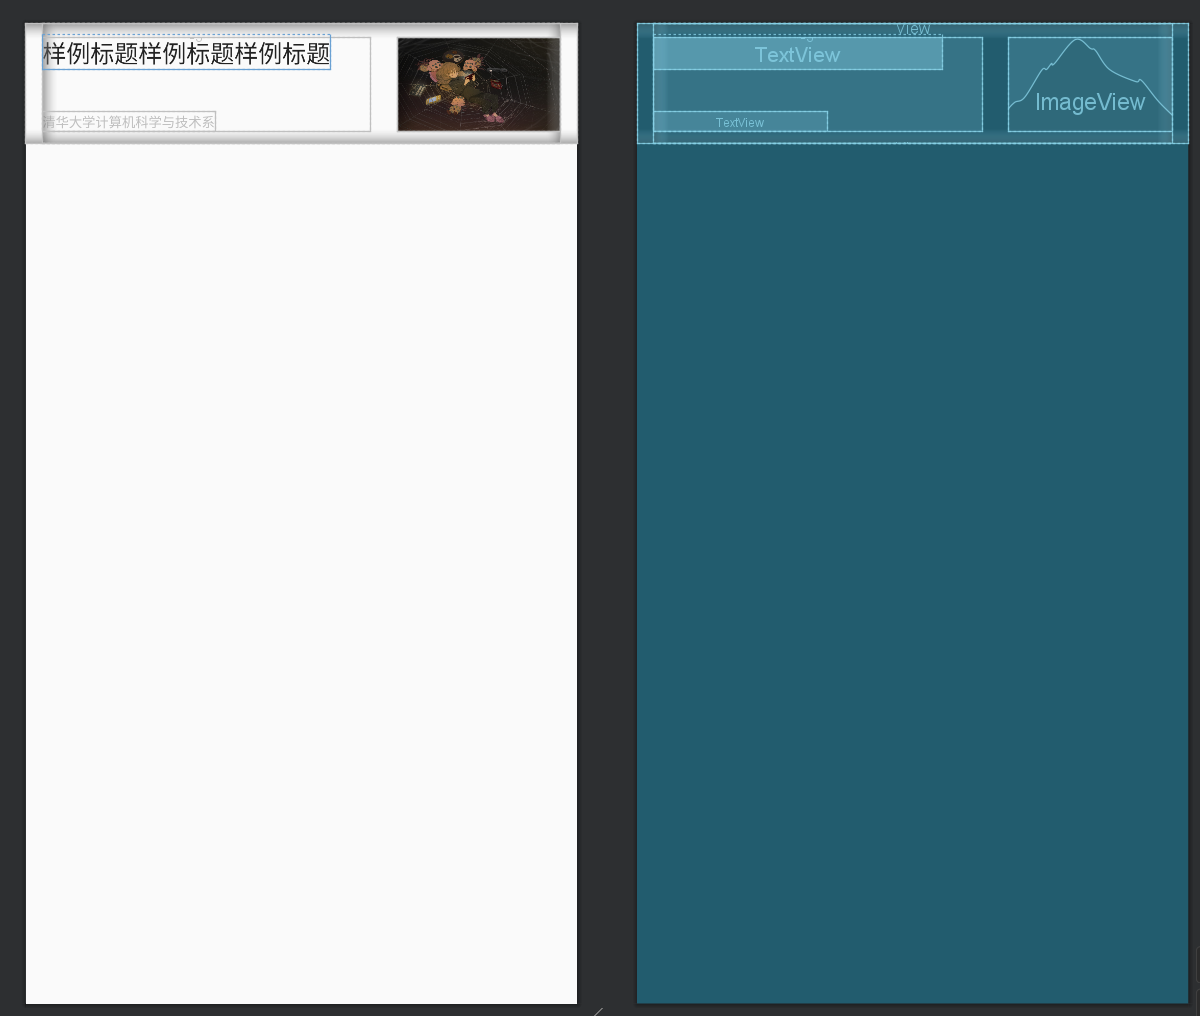
这里存储了你的 App 的本地资源。你可以在资源库里面存储 xml(布局文件)、图片、音频、字符串、颜色等。唯一需要强调的是 xml 文件。写 xml 文件就像画画,你需要使用各种 Layout 进行布局,把对应的部分插入到界面对应的位置。这些布局会用于下面所说的 Activity 或 Fragment。
news_item_one_image.xml
 1
 2
 3
 4
 5
 6
 7
 8
 9
10
11
12
13
14
15
16
17
18
19
20
21
22
23
24
25
26
27
28
29
30
31
32
33
34
35
36
37
38
39
40
41
42
43
44
45
46
47
48
49
50
51
52
53
54
55
56
57
58
59
60
61
62
63
64
65
66
67 | <?xml version="1.0" encoding="utf-8"?>
<LinearLayout xmlns:android="http://schemas.android.com/apk/res/android"
xmlns:app="http://schemas.android.com/apk/res-auto"
xmlns:tools="http://schemas.android.com/tools"
android:layout_width="match_parent"
android:layout_height="90dp"
android:orientation="vertical"
android:paddingLeft="12dp"
android:paddingRight="12dp">
<View
android:layout_width="match_parent"
android:layout_height="0.5dp"
android:background="#F8F8F8" />
<LinearLayout
android:layout_width="match_parent"
android:layout_height="match_parent"
android:paddingTop="10dp"
android:paddingBottom="10dp">
<RelativeLayout
android:layout_width="0dp"
android:layout_height="match_parent"
android:layout_weight="2">
<TextView
android:id="@+id/news_title"
android:layout_width="wrap_content"
android:layout_height="wrap_content"
android:layout_alignParentTop="true"
android:layout_marginTop="-3dp"
android:ellipsize="end"
android:maxLines="2"
android:text="@string/news_title"
android:textColor="#222222"
android:textSize="18sp" />
<TextView
android:id="@+id/news_desc"
android:layout_width="wrap_content"
android:layout_height="wrap_content"
android:layout_alignParentBottom="true"
android:ellipsize="end"
android:maxLines="1"
android:text="@string/news_author"
android:textColor="#BFBFBF"
android:textSize="10sp"
tools:ignore="SmallSp" />
</RelativeLayout>
<ImageView
android:id="@+id/news_image"
android:layout_width="0dp"
android:layout_height="match_parent"
android:layout_weight="1"
android:scaleType="fitXY"
android:src="@drawable/news_image"
android:layout_marginStart="20dp" />
</LinearLayout>
<View
android:layout_width="match_parent"
android:layout_height="0.5dp"
android:background="#F8F8F8" />
</LinearLayout>
|
得到的组件大概长这样。如你所见,前后两个 View 是上下占位边框,中间的部分是一组横向线性排列,权重为2:1;左边是两个文本框组成的,右边是一张图片。相信你逐一看上面的代码可以看懂,由于篇幅所限,我在这里就不再多写例子了。
下面,我们就进入正式的程序编写环节了。
组件
编写 Android 应用程序就像搭积木,组件是构建应用程序的基本单元。对组件来说,最重要的方法是围绕着生命周期和交互进行的。我们下面将对这些概念进行介绍。
Activity & Fragment
活动(Activity)代表应用程序的一个屏幕或一个交互页面。Android 应用程序通常由多个活动组成,并且可以通过意图(Intent)在活动之间进行切换。通过启动新的活动,可以实现屏幕之间的导航和交互。片段(Fragment)是一种可重复使用的 UI 组件,通常嵌入在活动中,每个 Activity 可以包含多个 Fragment。
Activity 和 Fragment 通过布局文件定义其用户界面的外观和结构。布局文件使用 XML 格式编写,其中包含各种视图组件,如按钮、文本框、图像等。通过调用 setContentView() 方法,可以将布局文件与活动关联起来。下面是一个最简单的例子。我们使用R.<path>来获取资源库的对应文件(如果你不确定写法,不妨打一个R.,然后让强大的 Android Studio 补全),这样你就可以看见你的组件了。
MyActivity1.java
 1
 2
 3
 4
 5
 6
 7
 8
 9
10
11
12
13
14
15
16
17
18
19
20
21
22
23
24
25
26
27
28 | import android.app.Activity;
import android.os.Bundle;
import android.view.View;
import android.widget.Button;
import android.widget.TextView;
import android.widget.Toast;
public class MyActivity1 extends Activity {
private TextView textView;
private Button button;
@Override
protected void onCreate(Bundle savedInstanceState) {
super.onCreate(savedInstanceState);
setContentView(R.layout.activity_1);
textView = findViewById(R.id.textView);
button = findViewById(R.id.button);
button.setOnClickListener(new View.OnClickListener() {
@Override
public void onClick(View v) {
Toast.makeText(MainActivity.this, "Button Clicked", Toast.LENGTH_SHORT).show();
}
});
}
}
|
activity_1.xml
 1
 2
 3
 4
 5
 6
 7
 8
 9
10
11
12
13
14
15
16
17
18
19
20
21
22
23 | <LinearLayout xmlns:android="http://schemas.android.com/apk/res/android"
xmlns:tools="http://schemas.android.com/tools"
android:layout_width="match_parent"
android:layout_height="match_parent"
android:gravity="center"
android:orientation="vertical"
android:padding="16dp"
tools:context=".MainActivity">
<TextView
android:id="@+id/textView"
android:layout_width="wrap_content"
android:layout_height="wrap_content"
android:text="Hello, World!"
android:textSize="24sp" />
<Button
android:id="@+id/button"
android:layout_width="wrap_content"
android:layout_height="wrap_content"
android:text="Click Me" />
</LinearLayout>
|
看见组件之后,你需要给组件定义实际的行为。每个 Activity 和 Fragment 都有其生命周期,描述了从创建到销毁的整个过程。在生命周期中,系统会调用特定的生命周期回调方法,以便程序可以在适当的时机执行相关操作。例如,在 onCreate() 中进行初始化,onResume() 中启动动画,onPause() 中保存数据等。Activity 和 Fragment 可以响应用户的触摸事件、按键事件等,并执行相应的操作。开发者可以通过重写事件处理方法,如 onTouch()、onKeyDown() 等,来处理这些事件。下面就是一个重载onTouch()的 Fragment 的例子。
CustomFragment.java
 1
 2
 3
 4
 5
 6
 7
 8
 9
10
11
12
13
14
15
16
17
18
19
20
21
22
23
24
25
26
27
28
29
30
31
32
33
34
35
36
37
38
39
40
41
42
43
44
45
46
47
48
49
50
51
52
53
54
55
56
57
58
59
60
61
62
63 | import android.os.Bundle;
import android.view.LayoutInflater;
import android.view.MotionEvent;
import android.view.View;
import android.view.ViewGroup;
import android.widget.Button;
import android.widget.TextView;
import androidx.annotation.NonNull;
import androidx.annotation.Nullable;
import androidx.fragment.app.Fragment;
public class CustomFragment extends Fragment {
private TextView textView;
@Nullable
@Override
public View onCreateView(@NonNull LayoutInflater inflater, @Nullable ViewGroup container, @Nullable Bundle savedInstanceState) {
View view = inflater.inflate(R.layout.fragment_custom, container, false);
Button button = view.findViewById(R.id.button);
textView = view.findViewById(R.id.textView);
button.setOnTouchListener(new View.OnTouchListener() {
@Override
public boolean onTouch(View v, MotionEvent event) {
switch (event.getAction()) {
case MotionEvent.ACTION_DOWN:
textView.setText("Pressing");
return true;
case MotionEvent.ACTION_MOVE:
textView.setText("Moving");
return true;
case MotionEvent.ACTION_UP:
textView.setText("");
return true;
default:
return false;
}
}
});
/* or use lambda function:
button.setOnTouchListener((v, event) -> {
switch (event.getAction()) {
case MotionEvent.ACTION_DOWN:
textView.setText("Pressing");
return true;
case MotionEvent.ACTION_MOVE:
textView.setText("Moving");
return true;
case MotionEvent.ACTION_UP:
textView.setText("");
return true;
default:
return false;
}
});
*/
return view;
}
}
|
fragment_custom.xml
 1
 2
 3
 4
 5
 6
 7
 8
 9
10
11
12
13
14
15
16
17
18
19
20
21
22
23 | <LinearLayout xmlns:android="http://schemas.android.com/apk/res/android"
xmlns:tools="http://schemas.android.com/tools"
android:layout_width="match_parent"
android:layout_height="match_parent"
android:gravity="center"
android:orientation="vertical"
android:padding="16dp"
tools:context=".CustomFragment">
<Button
android:id="@+id/button"
android:layout_width="wrap_content"
android:layout_height="wrap_content"
android:text="Button" />
<TextView
android:id="@+id/textView"
android:layout_width="wrap_content"
android:layout_height="wrap_content"
android:text=""
android:textSize="24sp" />
</LinearLayout>
|
Intent
假如我们现在有了一堆 Activity 等组件,一个很自然的需求就是让他们之间可以进行通信。最简单的例子是,一个活动调用另一个(我们可以在活动之间传递信息,就像函数一样)。
 1
 2
 3
 4
 5
 6
 7
 8
 9
10
11
12 | Intent intent = new Intent(CurrentActivity.this, TargetActivity.class);
/* optional:
Bundle bundle = new Bundle();
bundle.putString("string1", "YOUR_STRING");
intent.putExtras(bundle);
*/
startActivity(intent);
/* get your bundle in the target activity:
Bundle bundle = this.getIntent().getExtras();
String str1 = bundle.getString("string1");
*/
|
Service
并不是所有组件都是 Activity 和 Fragment,还有很多组件和界面无关,比如播放音乐或下载文件的组件。这就需要用到 Service。它的生命周期与 Activity 等有些差异。这里是一个音乐播放的 Service,在 onStartCommand() 方法中,我们通过接收 Intent 中的音乐 URL,使用 MediaPlayer 播放音乐。在服务销毁时,我们则需要释放 MediaPlayer 的资源。
MusicPlayerService.java
 1
 2
 3
 4
 5
 6
 7
 8
 9
10
11
12
13
14
15
16
17
18
19
20
21
22
23
24
25
26
27
28
29
30
31
32
33
34
35
36
37
38
39
40
41
42
43
44
45
46 | public class MusicPlayerService extends Service {
private MediaPlayer mediaPlayer;
@Override
public void onCreate() {
super.onCreate();
mediaPlayer = new MediaPlayer();
}
@Override
public int onStartCommand(Intent intent, int flags, int startId) {
String musicUrl = intent.getStringExtra("music_url");
try {
mediaPlayer.setDataSource(musicUrl);
mediaPlayer.prepare();
mediaPlayer.start();
} catch (IOException e) {
e.printStackTrace();
}
return START_NOT_STICKY; // don't restart when killed by system
}
@Override
public void onDestroy() {
super.onDestroy();
if (mediaPlayer != null) {
mediaPlayer.release();
mediaPlayer = null;
}
}
@Nullable
@Override
public IBinder onBind(Intent intent) {
return null;
}
}
/*
Intent intent = new Intent(CurrentActivity.this, MusicPlayerService.class);
Bundle bundle = new Bundle();
bundle.putString("music_url", "YOUR_URL");
intent.putExtras(bundle);
startService(intent);
*/
|
一些杂七杂八的玩意
下面这些可能不是 Android 最核心的组件,但是~在你做大作业时~很实用,在此简单介绍一下。
长期存储和数据库
制作一个应用程序,离不开数据的存储。对少量数据和大量结构化的数据,我们有不同的存储方式。
笔者推荐对少量数据使用 Android 内置的 SharedPreferences 类进行存储。SharedPreferences 使用键值对的形式来存储数据,每个键都必须是唯一的。可以使用字符串作为键来存储各种数据类型的值,如整数、浮点数、布尔值、字符串等。注意,它直接使用 .xml 文件存储所有内容,因此请仅用于存储少量数据。下面展示一个使用该类的 onCreate() 方法。
 1
 2
 3
 4
 5
 6
 7
 8
 9
10
11
12
13
14
15
16
17
18
19
20
21
22 | protected void onCreate(Bundle savedInstanceState) {
super.onCreate(savedInstanceState);
setContentView(R.layout.activity_main);
SharedPreferences preferences = getPreferences(MODE_PRIVATE);
SharedPreferences.Editor editor = preferences.edit();
Bundle bundle = this.getIntent().getExtras(); // load intent
String intentUserName = bundle.getString("user_name");
if(intentUserName != null && !intentUserName.equals("null")){
editor.putString("user_name", intentUserName);
editor.apply();
}
else {
userName = preferences.getString("user_name", null);
if (userName == null || userName.equals("null")){
userName = "Clancy";
editor.putString("user_name", userName);
editor.apply();
}
}
}
|
大量的结构化数据应该使用数据库存储。如果你会使用 SQL 语法,可以使用 SQLite 保存应用程序的数据。一个数据库是 SQLiteDatabase 类的一个对象。你可以使用 db.execSQL(SQL_OPERATION); 这样的语句来进行你想要的数据库操作,也可以用一些更为封装化的 API 接口,如insert(), delete(), query(), update()。
 1
 2
 3
 4
 5
 6
 7
 8
 9
10
11
12
13
14
15
16
17
18
19
20
21
22
23
24
25
26
27
28
29
30
31
32
33
34
35
36
37
38
39
40
41
42
43
44
45
46
47
48
49
50
51
52
53
54
55
56 | import android.content.Context;
import android.database.sqlite.SQLiteDatabase;
import android.database.sqlite.SQLiteOpenHelper;
import android.content.ContentValues;
import android.database.Cursor;
public class DatabaseHelper extends SQLiteOpenHelper {
private static final String DATABASE_NAME = "mydatabase.db";
private static final int DATABASE_VERSION = 1;
private static final String TABLE_NAME = "mytable";
private static final String COLUMN_ID = "id";
private static final String COLUMN_NAME = "name";
public DatabaseHelper(Context context) {
super(context, DATABASE_NAME, null, DATABASE_VERSION);
}
@Override
public void onCreate(SQLiteDatabase db) {
// create new table, you have to write raw SQL
String createTableQuery = "CREATE TABLE " + TABLE_NAME + "("
+ COLUMN_ID + " INTEGER PRIMARY KEY AUTOINCREMENT,"
+ COLUMN_NAME + " TEXT)";
db.execSQL(createTableQuery);
}
@Override
public void onUpgrade(SQLiteDatabase db, int oldVersion, int newVersion) {
// delete old database and build a new one
db.execSQL("DROP TABLE IF EXISTS " + TABLE_NAME);
onCreate(db);
}
public void insertData(String name) {
SQLiteDatabase db = getWritableDatabase();
ContentValues values = new ContentValues();
values.put(COLUMN_NAME, name);
db.insert(TABLE_NAME, null, values);
db.close();
}
public void deleteData(String name) {
SQLiteDatabase db = getWritableDatabase();
String whereClause = COLUMN_NAME + " = ?";
String[] whereArgs = {name};
db.delete(TABLE_NAME, whereClause, whereArgs);
db.close();
}
public Cursor getAllData() {
SQLiteDatabase db = getReadableDatabase();
// WARNING: THIS MAY BE SLOW!!!
return db.rawQuery("SELECT * FROM " + TABLE_NAME, null);
}
}
|
网络服务
OkHttp3 是一个功能强大、灵活且高效的 HTTP 客户端库,适用于各种网络通信需求。它为开发者提供了便捷的网络请求和处理功能,简化了网络编程的复杂性。首先,你需要在项目中添加 OkHttp3 库的依赖,在 build.gradle 文件中添加:implementation 'com.squareup.okhttp3:okhttp:版本号'。然后我们来看一个例子:
 1
 2
 3
 4
 5
 6
 7
 8
 9
10
11
12
13
14
15
16
17
18
19
20
21
22
23
24
25
26
27
28
29
30
31
32
33
34
35
36
37
38
39
40
41
42 | import okhttp3.OkHttpClient;
import okhttp3.Request;
import okhttp3.Response;
public class OkHttpExample {
public static void sendGetRequest() {
OkHttpClient client = new OkHttpClient();
Request request = new Request.Builder()
.url("YOUR_URL")
.build();
try {
Response response = client.newCall(request).execute();
if (response.isSuccessful()) {
String responseData = response.body().string();
// do something, such as parse a json file
// you may try obj = Gson().fromJson(responseData, yourClass.class);
}
} catch (IOException e) {
e.printStackTrace();
}
}
public static void sendPostRequest() {
OkHttpClient client = new OkHttpClient();
MediaType mediaType = MediaType.parse("application/json; charset=utf-8");
String requestBody = "{\"key\": \"value\"}";
RequestBody body = RequestBody.create(mediaType, requestBody);
Request request = new Request.Builder()
.url("YOUR_URL_2")
.post(body)
.build();
try {
Response response = client.newCall(request).execute();
if (response.isSuccessful()) {
String responseData = response.body().string();
// do something...
}
} catch (IOException e) {
e.printStackTrace();
}
}
}
|
多媒体
加载本地的图片是很容易的(自己试试看)。如果要通过 URL 加载图片,可以使用 Glide,它是一个开源图片加载和缓存库。首先我们要有一个 ImageView,然后通过 Glide 把给定 URL 的图片加载出来。
| ImageView imageView = view.findViewById(R.id.your_image);
Glide.with(YourApplication.getContext()).load(imageURL).into(imageView);
|
对于网络视频,我们可以直接使用 URL 进行加载。
| VideoView videoView = view.findViewById(R.id.your_video);
videoView.setVideoPath(video);
MediaController mediaController = new MediaController(getContext());
videoView.setMediaController(mediaController);
videoView.requestFocus();
|
一些开源项目
笔者在 github 发现了一个 Android 开源项目合集(不只是开源项目,还有一些教程和工具库),既有 Java 的项目也有 Kotlin 的,希望对你有所帮助。
https://github.com/aritraroy/UltimateAndroidReference
课程作业
原开源项目地址会在作业截止日期之后发布。
背景简介
单人跳棋,也被称为孤独跳棋、独粒钻石棋,是一种玩家独自进行的棋类游戏。与传统的跳棋相比,单人跳棋在棋盘上只有一个位置没有棋子,玩家的目标是通过跳跃和消除棋子,最终留下尽可能少的棋子在棋盘上。
下面是单人跳棋的基本规则:
- 棋盘:单人跳棋使用的棋盘如图所示,棋盘上有一系列交叉的线,形成许多交叉点。当然,初始的棋子布局不一定只有这一种,你可以自行设计合适的布局。

图片来源:https://en.wikipedia.org/wiki/Peg_solitaire
-
棋子放置:初始时,棋盘上除了中心位置的一个交叉点外,其他交叉点上都会放置一个棋子。
-
移动规则:玩家可以选择一个棋子进行移动。棋子可以沿着棋盘上的线水平或垂直方向移动,但不能斜向移动。
-
跳跃规则:玩家可以用一个棋子跳过相邻的另一个棋子,到达该方向的下一个格子,作为“落点”。操作棋子、被跳过的棋子和落点必须是一条直线,且落点是一个空位。被跳过的棋子将被移除。如果在跳跃后,仍然存在可以跳过的棋子,玩家可以选择继续跳跃。这样的连续跳跃可以一直进行下去,直到没有可跳过的棋子为止。这样的一系列操作算一步。
-
目标:玩家的目标是通过一系列的跳跃,最终只剩下一个棋子在棋盘上。最佳的结果是剩下中心位置的那个棋子。
单人跳棋是一种单人智力挑战的游戏,需要玩家预测和计划跳跃的顺序,以便最大限度地减少剩余棋子的数量。由于棋子的移动和跳跃规则相对简单,但游戏的难度可以通过调整初始布局和规则来增加。这使得单人跳棋成为一种有趣而富有挑战性的解谜游戏。
基本任务
你需要在我们给定的框架上,根据我们的注释提示,完成单人跳棋 App 的代码。
项目地址:https://github.com/sast-summer-training-2023/sast2023-java-and-android
扩展任务
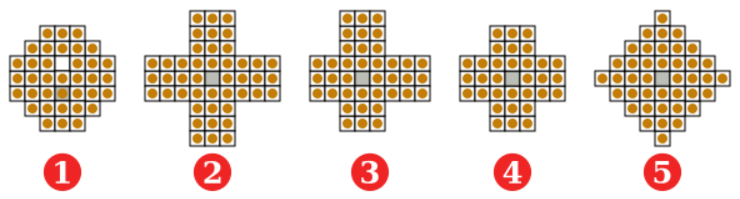
下列扩展任务的难度依次上升:(其实都没有特别难)
- 你需要支持在 App 内选择棋盘样式。一些可能的样式如下。
-
你需要将棋子的样式自定义为一张图片(请自行寻找合适的素材)。
-
你需要增加“名人堂”功能,支持存储并查看目前为止,完成游戏的最佳步数
最后更新:
2023年7月29日